How to Use HDMI on MacBook (Complete Guide for All Models)
Published: 17 Aug 2025
Using HDMI with your MacBook allows you to enjoy a larger screen experience, whether you’re watching movies, giving a presentation, or extending your desktop for productivity. Many users often ask questions like “Can I use HDMI on MacBook?” or “How to use HDMI on MacBook?” and this guide is here to answer all those questions in one place.
In this article, you’ll learn:
- Do MacBooks Have HDMI Ports?
- How to Connect HDMI to MacBook Air Models?
- How to Connect HDMI to MacBook Pro Models?
- How to Connect HDMI to MacBook Other Models?
And much more!!!
No matter which MacBook you use, this guide will walk you through everything from required adapters to troubleshooting tips so your HDMI setup works perfectly.
Do MacBooks Have HDMI Ports?
Not all MacBook models come with a built-in HDMI port. Some models include an HDMI port, while others require an external adapter or dongle to connect an HDMI display.
Below is a complete list of MacBook models and their HDMI compatibility:
1. MacBook Pro Models:
- MacBook Pro (14-inch, M3, 2023): Has built-in HDMI port (HDMI 2.1)
- MacBook Pro (16-inch, M3, 2023): Has built-in HDMI port (HDMI 2.1)
- MacBook Pro (14-inch, M2 Pro/M2 Max, 2023): Has built-in HDMI port (HDMI 2.1)
- MacBook Pro (16-inch, M2 Pro/M2 Max, 2023): Has built-in HDMI port (HDMI 2.1)
- MacBook Pro (14-inch, M1 Pro/M1 Max, 2021): Has built-in HDMI port (HDMI 2.0)
- MacBook Pro (16-inch, M1 Pro/M1 Max, 2021): Has built-in HDMI port (HDMI 2.0)
- MacBook Pro (13-inch, M2, 2022): No HDMI port (requires USB-C to HDMI adapter)
- MacBook Pro (13-inch, M1, 2020): No HDMI port (requires USB-C to HDMI adapter)
- MacBook Pro (Intel-based 13-inch, 15-inch, and 16-inch models): No HDMI port (requires Thunderbolt/USB-C to HDMI adapter)
2. MacBook Air Models:
- MacBook Air (15-inch, M2, 2023): No HDMI port (requires USB-C to HDMI adapter)
- MacBook Air (13-inch, M2, 2022): No HDMI port (requires USB-C to HDMI adapter)
- MacBook Air (13-inch, M1, 2020): No HDMI port (requires USB-C to HDMI adapter)
- MacBook Air (Intel-based, Retina 13-inch 2018–2020): No HDMI port (requires Thunderbolt/USB-C to HDMI adapter)
3. MacBook Retina (12-inch Models):
- MacBook Retina (12-inch, 2015–2017): No HDMI port (only one USB-C port, requires USB-C to HDMI adapter)
4. Older MacBook Models (Pre-2015):
- MacBook Pro (2012–2015 Retina models): Have built-in HDMI ports
- MacBook Air and older white unibody MacBooks: No HDMI port (require Mini DisplayPort to HDMI adapter)
How to Connect HDMI to MacBook Pro Models?
Here we will learn how to connect HDMI to all MacBook Pro models — including both old and new versions.
1. MacBook Pro (M3 Pro/Max, M2 Pro/Max, M1 Pro/Max)
- Connect the HDMI cable directly to the built-in HDMI port.
- Then connect the other end to your TV or monitor.
- The display will appear automatically.
- Go to System Settings > Displays to manage screen preferences.
2. MacBook Pro (13-inch M2, M1)
- Use a USB-C to HDMI adapter.
- Connect the adapter to the USB-C port of your MacBook, then plug in the HDMI cable.
- The display will show automatically.
- Adjust settings from System Settings > Displays.
3. MacBook Pro (Intel 2016–2020, USB-C only models)
- These models also need a USB-C to HDMI adapter.
- Plug the adapter into your MacBook, connect the HDMI cable, and turn on your external screen.
- If it doesn’t appear automatically, open System Settings > Displays.
4. MacBook Pro (2012–2015 with HDMI port)
- These models come with a built-in HDMI port.
- Just connect your HDMI cable directly to the MacBook and your TV or monitor.
- The display will work instantly.
- You can manage screen layout or mirroring from System Preferences > Displays.
How to Connect HDMI to MacBook Air Models?
In this section, we’ll learn how to connect HDMI to all MacBook Air models. Whether you’re using the latest M-series or older Intel models.
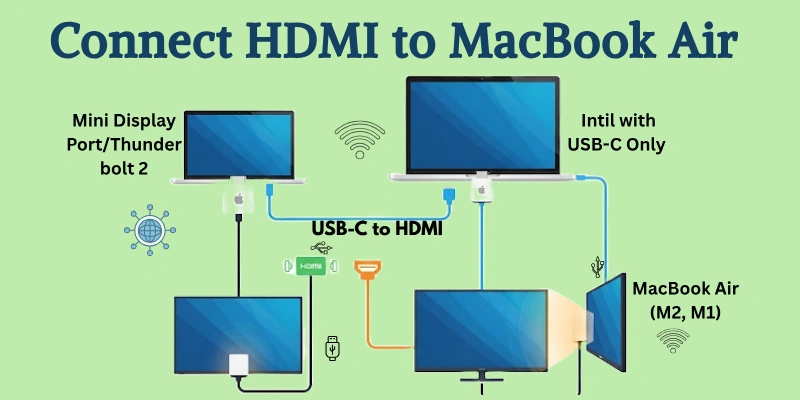
Here’s how to make HDMI work on your MacBook Air.
1. MacBook Air (M2, M1)
- These models do not have a built-in HDMI port.
- Use a USB-C to HDMI adapter.
- Plug the adapter into your MacBook Air’s USB-C port, then connect the HDMI cable to your TV or monitor.
- The display will appear automatically. Manage screen settings from System Settings > Displays.
2. MacBook Air (Intel 2018–2020 with USB-C only)
- Use a USB-C to HDMI adapter.
- Connect the adapter to one of the USB-C ports, then plug in your HDMI cable.
- Turn on your external screen — it should be detected automatically.
- Adjust display settings if needed.
3. MacBook Air (2010–2017 with Mini DisplayPort/Thunderbolt 2)
- These models require a Mini DisplayPort to HDMI adapter.
- Connect the adapter to the Thunderbolt or Mini DisplayPort on your MacBook Air, then plug in the HDMI cable.
- Your external display will show up automatically.
- Go to System Preferences > Displays to manage the screen layout.
How to Connect HDMI to Other MacBook Models?
Here’s how to connect HDMI on other MacBook models, including the 12-inch Retina MacBook and older versions before 2015.
Each model may require a different adapter, but connecting HDMI is still simple.
1. MacBook Retina (12-inch, 2015–2017)
- These models have no built-in HDMI port. Use a USB-C to HDMI adapter.
- Plug the adapter into the USB-C port, then connect the HDMI cable to your TV or monitor.
- The display will appear automatically.
- Adjust settings via System Preferences > Displays.
2. MacBook Pro (2012–2015 Retina models)
- These models include a built-in HDMI port.
- Simply connect the HDMI cable directly to the MacBook and the other end to your TV or monitor.
- The external screen will appear automatically.
- You can manage screen layout or mirroring from System Preferences > Displays.
3. Older MacBook Air and White Unibody MacBooks (Pre-2015)
- These models do not have an HDMI port.
- Use a Mini DisplayPort to HDMI adapter.
- Connect the adapter to the Mini DisplayPort, then plug in your HDMI cable.
- The display will start showing automatically.
- You can modify screen preferences under System Preferences > Displays.
What to Do If HDMI Is Not Working on MacBook?
If your MacBook is not detecting the HDMI connection or the display isn’t showing up, try the following simple steps to fix the issue.
- Check the HDMI cable and port: Make sure the HDMI cable is properly plugged into both the MacBook and the TV/monitor. Try using another HDMI cable or port to rule out hardware issues.
- Ensure the adapter is working: If you’re using a USB-C to HDMI or Mini DisplayPort to HDMI adapter, make sure it’s compatible and working properly. Try testing it with another Mac or screen.
- Restart your MacBook: Sometimes a simple restart can help your Mac detect the HDMI display.
- Select the correct input on your TV or monitor: On your external screen, make sure the correct HDMI input source is selected (e.g., HDMI 1, HDMI 2, etc.).
- Check display settings: Go to System Settings (or System Preferences) > Displays. Click “Detect Displays” if the screen isn’t showing. You can also adjust resolution, refresh rate, and mirroring options from here.
- Update macOS: Ensure your macOS is updated. Sometimes software bugs can cause display issues, and updates often fix these.
- Try another port or adapter: If you’re using a multiport adapter or hub, try connecting HDMI directly using a basic adapter to eliminate compatibility issues.
- Reset NVRAM/PRAM and SMC (for Intel Macs): On older Intel-based MacBooks, reset NVRAM/PRAM and SMC to fix display-related glitches.
Display Settings and HDMI Preferences on MacBook
Once you’ve connected your MacBook to an external screen using HDMI, you can customize the display settings for better viewing.
- Open System Settings (macOS Ventura and later): Go to Apple menu > System Settings > Displays. You will see both your MacBook screen and external HDMI screen.
- For older macOS versions: Go to Apple menu > System Preferences > Displays.
- Mirror or Extend Display: You can choose to mirror your MacBook screen on the HDMI display or use it as an extended desktop.
- Adjust resolution and refresh rate: Select the external display and change resolution or refresh rate for better quality and performance.
- Rearrange display position: Drag and position the screens visually to match your physical setup (left, right, top, etc.).
- Enable HDR (if supported): If your MacBook and display support HDR, you can turn it on from Display settings.
- Detect Displays manually: If the screen isn’t showing up, click “Detect Displays” to force Mac to recognize the HDMI output.
Conclusion
In this article, we explored how to connect HDMI to your MacBook, covering the types of ports, adapters you might need, and step-by-step connection methods.
As a MacBook expert, I highly recommend choosing a good-quality HDMI adapter that’s compatible with your Mac model for the best performance. Don’t forget to check out the next section—the FAQs—because some essential information is still waiting for you there!
FAQs
So, guys, here are some of the most commonly asked questions related to “MacBook and HDMI connection and usage”:
Make sure your MacBook has an HDMI port or use the right adapter (like USB-C to HDMI). Connect your HDMI cable properly and go to System Settings > Displays to configure it. If the screen doesn’t show up, try restarting your Mac or using “Detect Displays”.
Connect the HDMI cable to your MacBook and the other end to your monitor or TV. Your Mac should automatically recognize the external display. If not, go to Display settings and manually click “Detect Displays” for it to work.
Use a compatible HDMI adapter if your MacBook doesn’t have a built-in HDMI port. Plug the HDMI cable in and adjust settings from Display preferences. You can use it either for screen mirroring or as an extended screen for multitasking.
Check your cable and adapter for any damage or loose connection. Try reconnecting everything and restart your Mac if needed. Also, go to Displays settings and click “Detect Displays” to refresh the connection.
Yes, most modern MacBooks (like M1/M2 models) need a USB-C to HDMI adapter. Only older MacBooks have direct HDMI ports. Using a good-quality adapter ensures better display output without flickering.
Yes, you can connect your MacBook to your TV easily using an HDMI cable. Just plug in the cable and select the HDMI input on your TV. Your Mac screen will appear on the TV, great for watching videos or presentations.
Go to System Settings > Displays on your Mac after connecting the HDMI. You can change resolution, brightness, and layout settings. Choose between screen mirroring or extending the display for better productivity.
Use a high-speed HDMI 2.0 or HDMI 2.1 cable for best performance and video quality. These support 4K and smooth display output. Also, make sure to use an Apple-compatible or branded adapter for a reliable connection.


- Be Respectful
- Stay Relevant
- Stay Positive
- True Feedback
- Encourage Discussion
- Avoid Spamming
- No Fake News
- Don't Copy-Paste
- No Personal Attacks
- Be Respectful
- Stay Relevant
- Stay Positive
- True Feedback
- Encourage Discussion
- Avoid Spamming
- No Fake News
- Don't Copy-Paste
- No Personal Attacks
